Skip to Main Content
Oakland Community College Home

Libraries

Find Books / Library Catalog | Find Articles / Databases | Research Guides | Libraries Home

* OCC LibGuide Help

Add a Book from the OCC Catalog


1. Within a box, click on the Add/Reorder menu at the bottom, and select "Book from the Catalog." 

Add Book from the Catalog


2. Enter the book's ISBN and then click "Get Book Info." This will generate an image and a description for the book. Edit or delete the info fields as you wish, but try to maintain consistency when adding multiple books.  

Enter the ISBN

3. In the URL field, enter the book's permalink from OCC's catalog entry. 

Add the book's permalink in the URL field

4. In the Cover Art section, add the book's title in the ALT Text field. If there isn't a cover available, you can use the first drop-down menu to select a generic book cover image. 

5. Click Save. 

Reuse a Box from Another LibGuide


1. Click "Add Box" on your desired LibGuide page/column. 

2. Click on the "Reuse Existing Box" tab. From there, select the guide and name of the box that you want to reuse. Give your box a name (or leave that field blank to keep its existing name), then click "Save."

""

(If you want to make a copy of the box instead, select the "Copy" option. Note that any changes made on an original box will NOT be made to a copy of that box.)

Add a Subpage


To add a page under an existing page, as a drop-down menu item:

  1. Click the tab with a "+" from the right-most or bottom of the tabbed navigation, depending on which guide layout you already have.  It will look like this:


  2. Enter the name for your sub-page and select the desired position within the page, then click the Save button. 

Add a Database Link


  1. Click "Add / Reorder" at the bottom of any box.
  2. Select "Database."
  3. Search for the database that you'd like to add. 
  4. Click "Save."

Reorder Boxes within a Page


On any page, use the drop-down menu just under the tabs for Page and select re-order Boxes. You can then drag & drop them where you'd like.

Set Up a Link to Open in a New Window 


External links — links that are not within the OCC website — should be set up to open in a new window. There are two ways to do this. 

In hyperlinked text:

  • Highlight the text you want to link, and click the "Link" button from the top toolbar. 
  • Enter your URL, then click the "Target" tab. (See image below)
  • Select "New Window (_blank)" from the dropdown menu.
  • Click "OK."

""


Using the Add Link feature:

  • Click on the Add/Reorder button on the box in which you'd like your link to appear. 
  • Once the "Add Link" box opens, select "Link" from the dropdown menu. This will open the "Add Link" box. 
  • Enter your link name and URL, and then select "Open in New Window" in the Window Target field. 
  • Click the Save button. 


Reuse Database or Video Tutorial Links


You may want reuse database links or boxes in your guide. The advantages of reusing links are:

  • Consistent information about databases across all guides
  • Changes to database links are updated automatically on your guide 

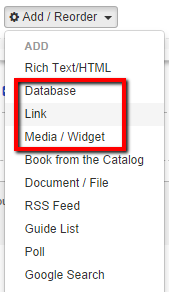
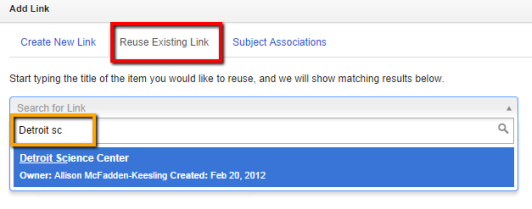
Follow these steps to reuse links, databases, or embedded media widgets in your guide:

  1. Click "Add / Reorder" at the bottom of any box.


  2. Select the link type you wish to re-use.
  3. On the dialog window, select "Reuse existing link" [red call-out in image below].
  4. Once you type 3 letters of an existing link title, suggestions will start to appear [yellow call-out in image below].


  5. From here you have 2 options:
    1. You can save the link as is. If the owner of the link updates the link URL, title, or description, the link on your page will update itself.
      OR
    2. You can make a copy instead of mapping to the original. If you check this box, changes made to the original resource will not affect this copy you are creating.

Link Directly to a Document in LibGuides


You can create direct links to documents housed in in LibGuides by using the asset ID number.

  1. In LibGuides, select Content > Assets from the top menu.
  2. Use the shaded search area at the top of the assets page to filter a search for the asset you'd like to link. Enter the name (if known) or a descriptive keyword int he Name/Title box and set the Type to Document then select Filter.


  3. A filter list of assets will appear below. Find the one you want and use the ID number in the first column create the link.
  4. Create the link by adding the ID number to the end of this URL:
    https://libguides.oaklandcc.edu/ld.php?content_id=
    For example, a document with this ID - 4971313 - would end up like this:
    https://libguides.oaklandcc.edu/ld.php?content_id=4971313

Hide a Subpage From Public View


To hide a subpage, click on the "Page" menu, and select "Do not show on public guide" under the Visibility heading. 

Hide a Guide from Public View


  1. If you are editing a guide, you can hide it from public view by selecting the Edit Guide icon [on the far right of the page menu towards the rop right of the guide, next to the eye icon], and choosing "Change Status & Share" from the dropdown menu. 


  2. Select Private to not display this guide on the public version of the guide — the page will still be available in admin/edit mode so it can be edited. Or select Unpublished if you want the guide to still be fully visible, but only to people who have the URL.


Add or edit a document or file link


Uploading a new file

  • Click the Add / Reorder button in the box where you would like the document to be linked
  • Select Document / File
    • Provide a Document Title.  Provide a Description if desired and choose how you'd like it to display.
    • Click the Select File button to locate the file to upload.
    • You may optionally require a password for the document.
  • Click Save at the bottom left of the box to upload the document.

Update an existing file

  • Click the Edit button to the right of the linked document.
  • Click the Change File button to upload a replacement document.
  • Click Save at the bottom left of the box to upload the new document.

Create Friendly URLs


  1. Toward the top of the guide, under the title & description, you will see

  2.  
  3. Click the pencil icon to customize the extension of the URL

Assign Tags and Subjects to a LibGuide


  1. Under the page title * description at the top of your guide, click the pencil icon next to either Subjects or Tags [Red call-out in the image below]


  2. Select your desired subjects or tags from the list to assign them to the guide. 

Selecting the subject All Guides will automatically include it on the list of all guides at https://libguides.oaklandcc.edu/allresearchguides.

Make sure to also manually add the guide to the appropriate alphabetical letter tab.

Add a LibGuide to a Course or Research Guide List


First, you’ll need to add the subject 'Course Guide' on the LibGuide that you're hoping to add to the Course Guide list.

See here:

This will make the guide show up at https://libguides.oaklandcc.edu/course_guides


If you also want the guide to appear on the list of all guides at https://libguides.oaklandcc.edu/allresearchguides you’ll need to add the additional subject "All Guides," just as you added Course Guides. This will make it show up on the All Guides list https://libguides.oaklandcc.edu/allresearchguides under the All Tab:


While adding the 'All Guides' subject to a guide does make it automatically appear under the All guides tab pictured above, if you want it also listed under one of the alphabetical filters that is one more manual step:

  • Select your guide from the list and Save.

Add an Email Link in the Rich Text Editor


To add a linked email address in the Rich Text Editor:

  • With the Rich Text Editor open to edit, type the email address where you would like it to appear.
  • Highlight the email address then select the Link icon from the editing menu.


  • Edit the Display Text if desired, then select E-mail as the link type. Enter the email address in the space provided. Add message subject or message body information as desired.


  • Select OK

Toggle Off Comments and Profile Displays


  1. From within the guide, click on the "Guide Look & Feel" button from the dashboard menu at the top of the screen.

  2. Select "Toggle All Comments" OR "Toggle All Profile Boxes."
  3. Select Enable / Disable for the page or guide [for comments].
    OR
    Hide / Show [for profile boxes].

Preview a LibGuide in Desktop and Mobile Views


Before publishing your guide, view a preview by clicking the "Guide Preview" button. This appears as an "eye" icon in the top right menu of any LibGuide page while in admin mode. The preview will show how the page will look on a typical desktop/laptop computer screen. 
 

Mobile View

It's also beneficial to preview how your LibGuide will look when viewed on a mobile device. There are two ways to do this:

1. Click on "Guide Preview" to see your guide, then drag the side of your browser window to make it smaller. 

2. While viewing your guide in Guide Preview mode, right click anywhere on the page. Choose "Inspect" from the menu.

  • If using Chrome or Edge web browsers: Click the "Dimensions" drop-down menu at the top of the preview window and select a mobile device size to view.
  • If using Firefox: Click the "Responsive Design Mode" button (looks like a pair of mobile devices), on the right side of the top menu. Use the options at the top of the preview window to select a mobile device size to view. 
OCC is committed to empowering our students to succeed and advancing our community.
©2024 Oakland Community College, OAKLAND COMMUNITY COLLEGE / 2900 FEATHERSTONE ROAD, AUBURN HILLS, MI 48326, 248.232.4100
Privacy Statement | Accreditations | Web Accessibility | Webmaster